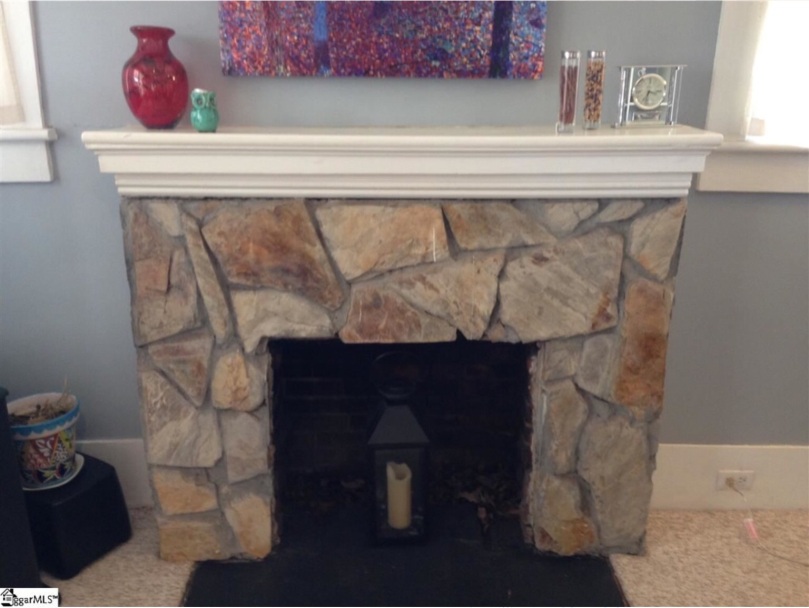
As I mentioned yesterday, our living room and hallway floor renovation did not go as smoothly or as quickly as we planned. Since our floor reno came to a dead halt, I had some time and decided to tackle our fireplace renovation. Our fireplace came to us with an ugly faux stone façade which was hiding the brick underneath. Our home is a craftsman home and the stone did not fit the character. Here’s a look at the fireplace the day we viewed the home for the first time:

Luckily for us, the person who placed the stone on the fireplace did a pretty lousy job and it basically came right off, but once again we weren’t sure what we would find underneath…


So obliviously there was some fire damage to the bricks at some point in time. In case you hadn’t guessed it from this photo, our fireplace is not a working fireplace. My next step here was to clean the fireplace as well as I could. Then, I put my experience from repointing at Fort Pulsaski in the summer of 2011 to the test and repointed our fireplace. My original plan was to repoint the entire fireplace but that did not last long. Chiseling out old mortar is a very messy process especially inside and the old mortar was like soot and got everywhere! James convinced me to only do what was 100% necessary. Here is what it looked liked after repointing:
 It still looked pretty scary, but got much better after I primed it.
 Around this time, we thankfully made progress on the floor. Our realtor, Gina Calvin’s husband and son, John and Ben Calvin, have a renovation business and were able to help get us out of our floor predicament and completed the floor install for us. We were sooo grateful for their help and they did a fantastic job installing the new pieces of wood floor.
Here is what the floor looked like after the new pieces were installed.
So now that we had our install completed we were able to have the floors sanded and stained. In order to complete this process we had to be out of the home for basically a week.
We had a couple of weeks in between the time of the floor install and sanding so we decided to go ahead and paint our living room. The previous color was a blue shade. We knew we wanted to paint the living room a grey color and after much debate decided to go with Stonington Grey by Benjamin Moore. Let me just say Benjamin Moore may be more on the expensive side as far as paint goes but it is definitely worth every penny! The paint lasts forever and a little goes a long way. My dad came to help us paint and even he was very impressed with the quality of the paint. Here is a photo of the room just after we painted and with the newly sanded floors.
 Ahh, we were looking so much better!
John was able to cut and even out some of the bricks on the fireplace for us. Since, I didn’t repoint a lot of the mortar in that area, some of the bricks came loose, but I was able to re-stack/lay the bricks back into place with new mortar. Here is what it looked like after I completed the process.

I still need to paint the hearth, but I think it looks much better than the stone.
And finally, our completed floors!


Yay! We waited 2 weeks to move our furniture and rugs into the living room (they said one week, but we decided to wait 2 just to be on the safe side). We finally feel more at home now that we can actually use our living room!
